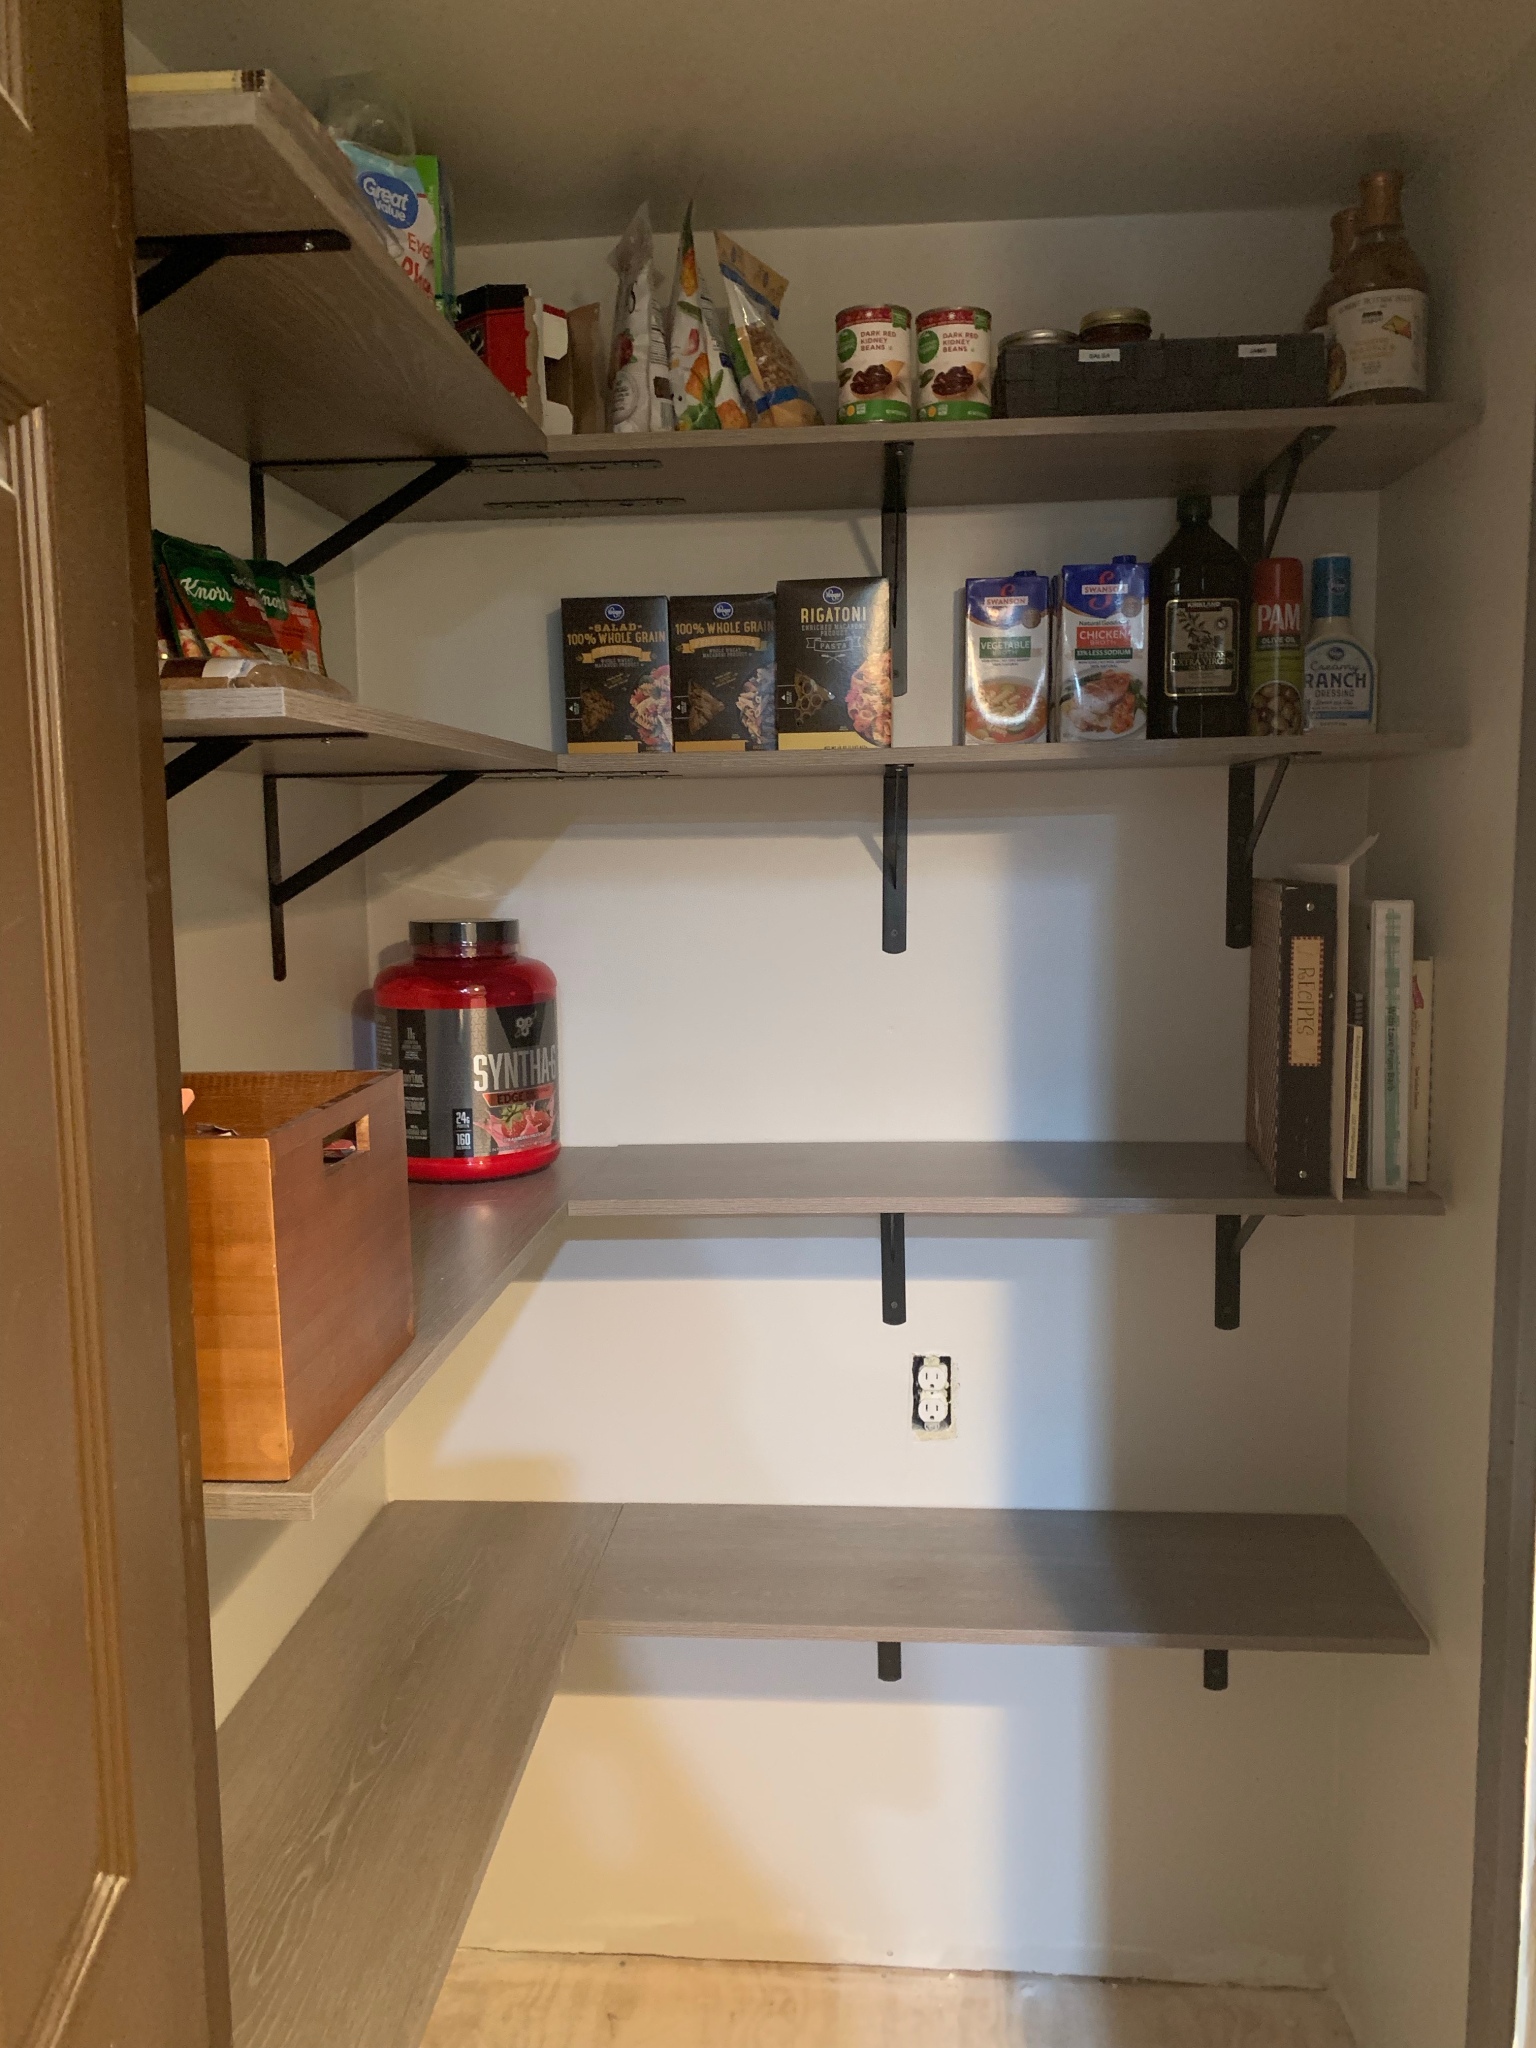
The first stop is actually not in my kitchen, it’s the pantry right off the kitchen. We changed the entrance to our kitchen so I could have a bigger stove. Our new entrance comes where an old bathroom once was. The pantry is now what was once a shower. I wanted this pantry to have a rack for my brooms and steam mop. We also bought some shelves from Menards to store food easily. I love the look of those Pinterest worthy pantries with matching storage boxes, but I don’t have time to keep up with that look and quite honestly those boxes are kind of pricey. I did find some clear boxes at Target that were cheap, and I could easily use my label maker on. I love having a pantry. We didn’t have one in our last house and honestly, I didn’t realize how much cabinet storage food took up!
Once you finally enter the kitchen, you are met by my obnoxious orange wall. (Ok it isn’t really obnoxious.) I chose a burnt orange color because I absolutely loved these Spanish tiles I received from my Grandma and they really pop on the orange.
Plus, it just makes the kitchen feel so inviting. It also helps bring in some more warmth to my kitchen. The cabinets I chose are a beautiful rustic alder finished in husk, but they have some cool tones to them. I chose the husk since it matched the closest to the beams in our favorite room. The white upper cabinets I chose helped us keep costs down. My poor husband probably hated me as I stood in the cabinet showroom at KSI, I was looking at so many different white options and I know he couldn’t tell the difference, nor did he care. I chose moonshine for the uppers as it had some of the grey tones that husk provided and kept the white from going yellowish. The cabinets we went with are Merillat cabinets and we got them through KSI here in the Toldeo area. My cabinets are all soft close, and I did choose to go with more drawer cabinets because I prefer them. I ultimately went with two different lines of Merillat cabinets. The uppers are the starting line, while my lowers are the next line up. Because they are two different cabinet lines even though they are from the same manufacturer there was no guarantee that the stain would match up perfectly (thus my reason for a two-tone kitchen). This also meant that I was more limited on the door styles as only a few door options were the same throughout the lines. I chose a more expensive line for my lower cabinets because I needed them to hold the weight of my massive island. Also, to save money I did not go with the full overlay cabinets. This simply means that the door of my cabinets do not completely cover the face of the cabinet. I think my kitchen still looks like a million bucks and saving money in some spaces allowed me to splurge in others.
I absolutely love the cabinets though. Some of the splurges I went with on my cabinets was a wooden range hood. I did the range hood in the husk color to help break up a lot of the white. The insert for the range hood (the actual part that does all of the work) is from zline. This is the same manufacturer we used for my ginormous stove and my microwave. It works great and they are made here in Ohio. Other splurges inside my cabinets are: a spice rack hanging cabinet, full pull out shelve drawers, a cookie sheet drawer cabinet, and a utility drawer cabinet. I also did a trash and recycle cabinet right in the island for me to sweep prep work cuttings and crumbs in quicker.
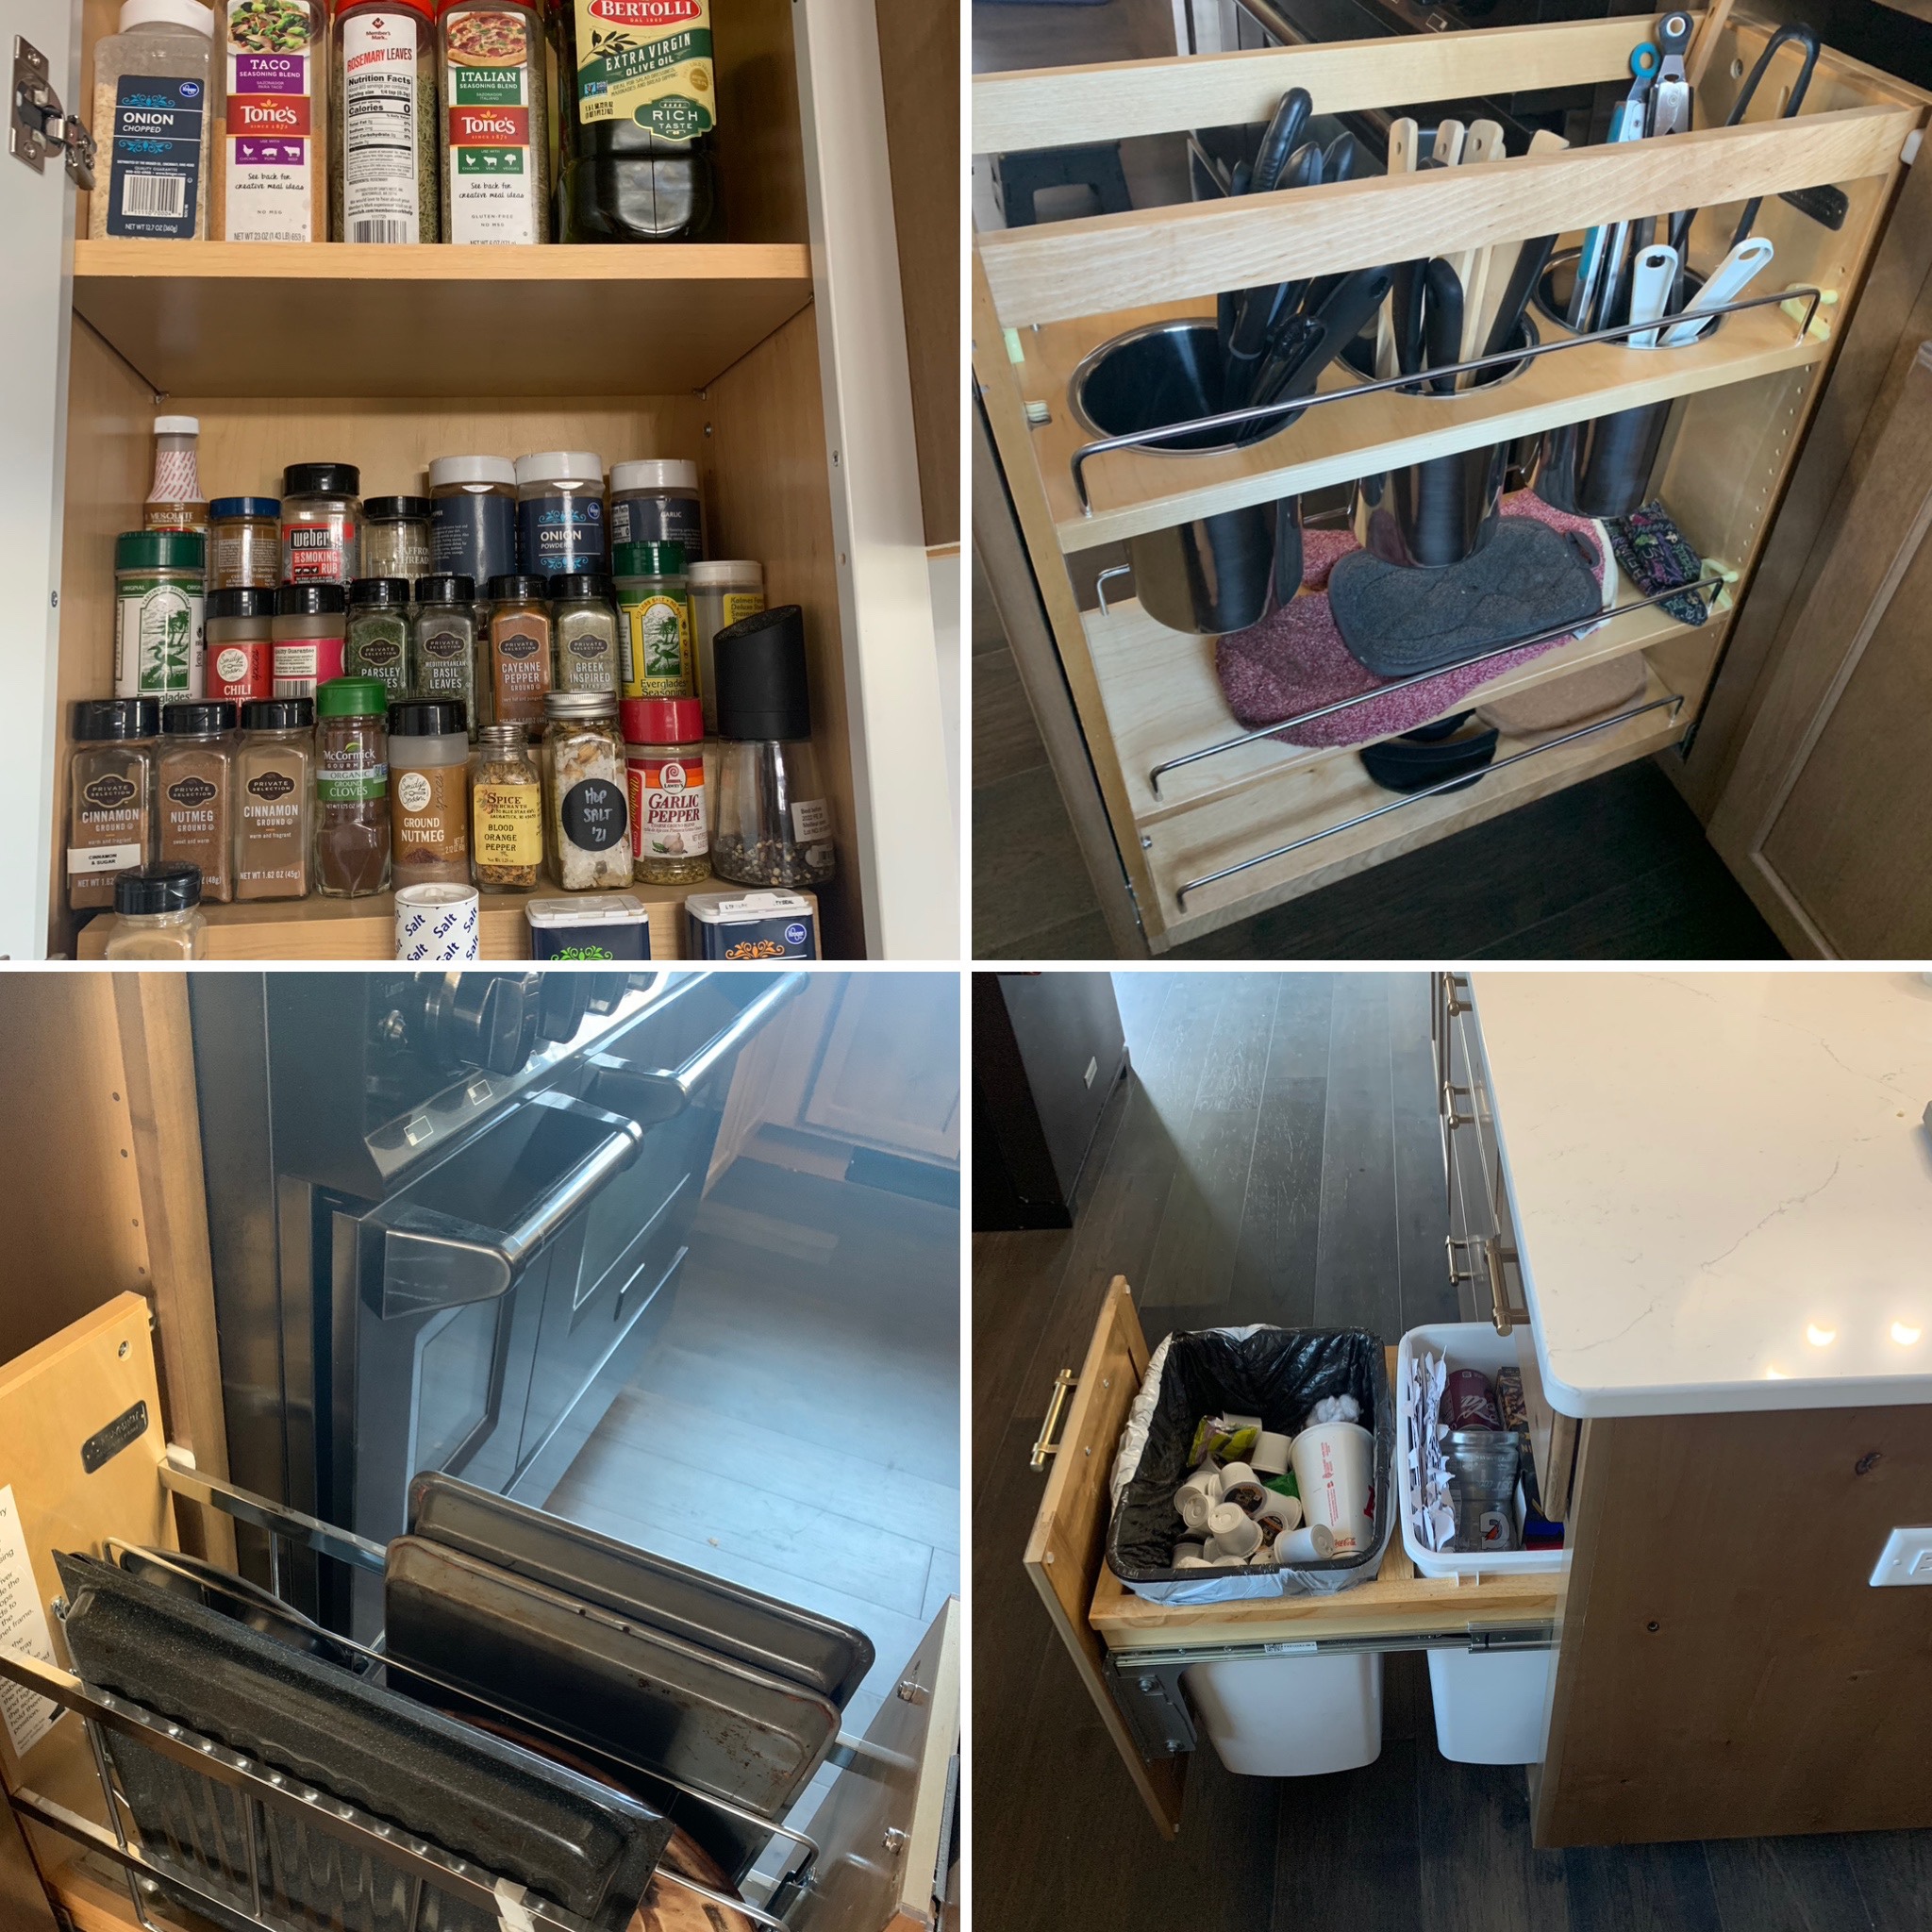
I could have done more options for storage organization through the cabinet manufacturer, however I found it was cheaper to buy some of these storage options at Ikea or even at the Container Store. One of my favorite purchases is actually a simple letter organizer that I use to organize my Tupperware lids. It works fantastic and I can always find the right lids. By not completely blowing my budget on my cabinets it allowed me to plan for the massive stove I wanted, and the backsplash of my dreams.
I love to cook. I fell in love with gas ranges when we lived in our first house. I love that now there are electric ovens with gas cook tops. I know that there is a lot of press out there about gas cooking right now, but I still love using it. I also make sure to have my hood vent on when I use it. A properly vented gas stove and hood vent probably helps reduce the indoor pollution. That being said, I went with a Zline black stainless, 48-inch dual fuel range. This means my oven is electric and the stove top is gas. I loved the look of black stainless. If I was looking at replacing our stove anytime soon, I might not consider doing black stainless again. It is harder to keep clean. However, I love love love love baking in my double ovens. I usually use the small oven for meats. My larger oven is reserved for cookies, vegetables, casseroles, and anything else I dream up. It took me some time to get used to the stove top. Once I lit the burner I thought I only had two cooking temps. It appeared my options were high or higher. I then realized if I turned the dial the opposite way from lighting the burner, it reduced the flame. That was and still is awesome, but I wish I would have known that earlier. I have burnt a few dishes before learning that trick. I also have a pot filler. I didn’t want a pot filler. I thought it was a waste of money. Darren however said since we have the wall open, and it is like $5 to run a water line there I was getting a pot filler. I showed him how ridiculously overpriced a brushed champagne gold pot filler hardware was. He told me I could find a cheaper alternative, but I was still getting a pot filler. He was adamant we were getting a pot filler. I was struggling with finding one I liked, because I had picked out brushed champagne hardware as our cabinet drawer pulls (the pulls came with our cabinets from KSI). I also had fallen in love with a high end sink in champagne that I really didn’t want to go an alternative route and I thought a pot filler would eat into my sink budget. Because I had saved us money in other areas, and then I won an award at work, I ended up getting a pot filler that matched my sink. I hate to say this, but Darren was right on making me get the pot filler. I do use it quite often.
I haven’t chosen a backsplash for the entire kitchen. I am not sure if I will, I do have a backsplash behind my range. I decided to continue our countertops up the wall behind the range. I did this because I HATE CLEANING GROUT. I also did this because I am somewhat of a messy cook. It is so easy to clean and quite honestly I love how it matches my countertops perfectly. These countertops almost didn’t happen. I have always loved quartz and I know I have blogged about my countertop drama before, but I am blogging about it again. I chose a massive island because as much as I love my husband (I’m guilty of it too) my kitchen island at our old house became a dumping ground for mail. I love using my island as a prep space, I love that we oftentimes eat at the island, and I love that it’s a hangout space while I’m cooking.
But I want to also use it for functionality. So I made it about the size of a king size bed. Unfortunately that meant the quartz countertops I fell in love with, weren’t going to work. Well they would be able to install it but it would have a seam on my island. I didn’t want that. My little quartz loving heart was devastated and I started looking at granite. There is nothing wrong with granite, I just personally don’t like it as much as quartz. I feel like granite is a bit more busy. It is just a personal preference. A lot of the granite slabs also weren’t necessarily big enough for my island either. Then the show room worker told me about Daltile jumbo slabs. We drove out to Akron to look at the types of jumbo slabs. I had a hard time picking. I actually did fall in love with some granite and even marble, ultimately though I ended up with a beautiful subtle quartz. It looks amazing in the kitchen and is so easy to clean.
Another easy to clean thing in my kitchen is my sink. I really did not want a farmhouse sink. I wanted something close to a double bowl sink. Unfortunately with the layout of our HVAC system and plumbing I was unable to move the sink over further. That meant I had to do the dreaded corner cabinet and didn’t have room for a lazy Susan or the corner drawers I really wanted to do. I also realized because I am very short, an upper cabinet in that spot would not make sense, so I decided to do open shelves. I am not really a fan of open shelves in a kitchen. I think they can look nice but i do not like having all of my items on display. Plus I don’t like how dust and dog hair can end up on the shelves. So I kept ours mostly for cookbook storage.
But back to my sink. Because of HVAC and plumbing and wanting room for a dishwasher, I needed to do a smaller sink base. This meant I was somewhat limited on the size of my sink. I ended up finding this one and a half bowl, composite Blanco sink at Home Depot. I was worried about getting a composite sink because I’ve heard horror stories of hairline cracks and leaks, it always looking dirty, and not handling high heat. I have never been one to set anything immediately from my oven or stove into the sink so I felt I’d be ok there. I chose a dark sink so I wasn’t worry about it looking dirty. And our plumber inspected it well for chips and cracks. It’s been a great sink. It is tough and I have broken a plate in it, but it’s held up beautifully and I love using it.
The appliances in my kitchen are a mix of KitchenAid and Zline. We went with Zline for the stove, hood vent, and microwave. They all work great and are nice looking. The microwave is a drawer microwave. We had one in our last house and Darren really wanted one again. Honestly, I’m not all that impressed with them. I personally don’t like cleaning it since it’s harder to get crumbs out of. Also we broke the door when installing it so you do have to push ours shut. We will replace it eventually. But he loves the drawer and that it’s tucked out of the way. I just imagine a 2 year old pushing a lot of buttons eventually…Our refrigerator was a Facebook marketplace find. We bought it just to work until we had planned out our kitchen. Then we thought we’d move it to the basement. Except we really like it. It’s quiet, it works nice, I like how much storage it has. I like that all the shelves are adjustable while locked in place. It’s a good fridge. Probably not worth the price tag brand new but it’s a good fridge. What was worth the price tag brand new was the dishwasher. I love our dishwasher from KitchenAid. It’s quiet. It has a third row rack. It does a very good job of drying Tupperware. If my husband doesn’t rinse dishes it still gets them clean. I love it. Also I have noticed that the black stainless from KitchenAid doesn’t smudge or get fingerprints as often as the Zline does. I do like all of our appliances and would be willing to repurchase either brand in the future.
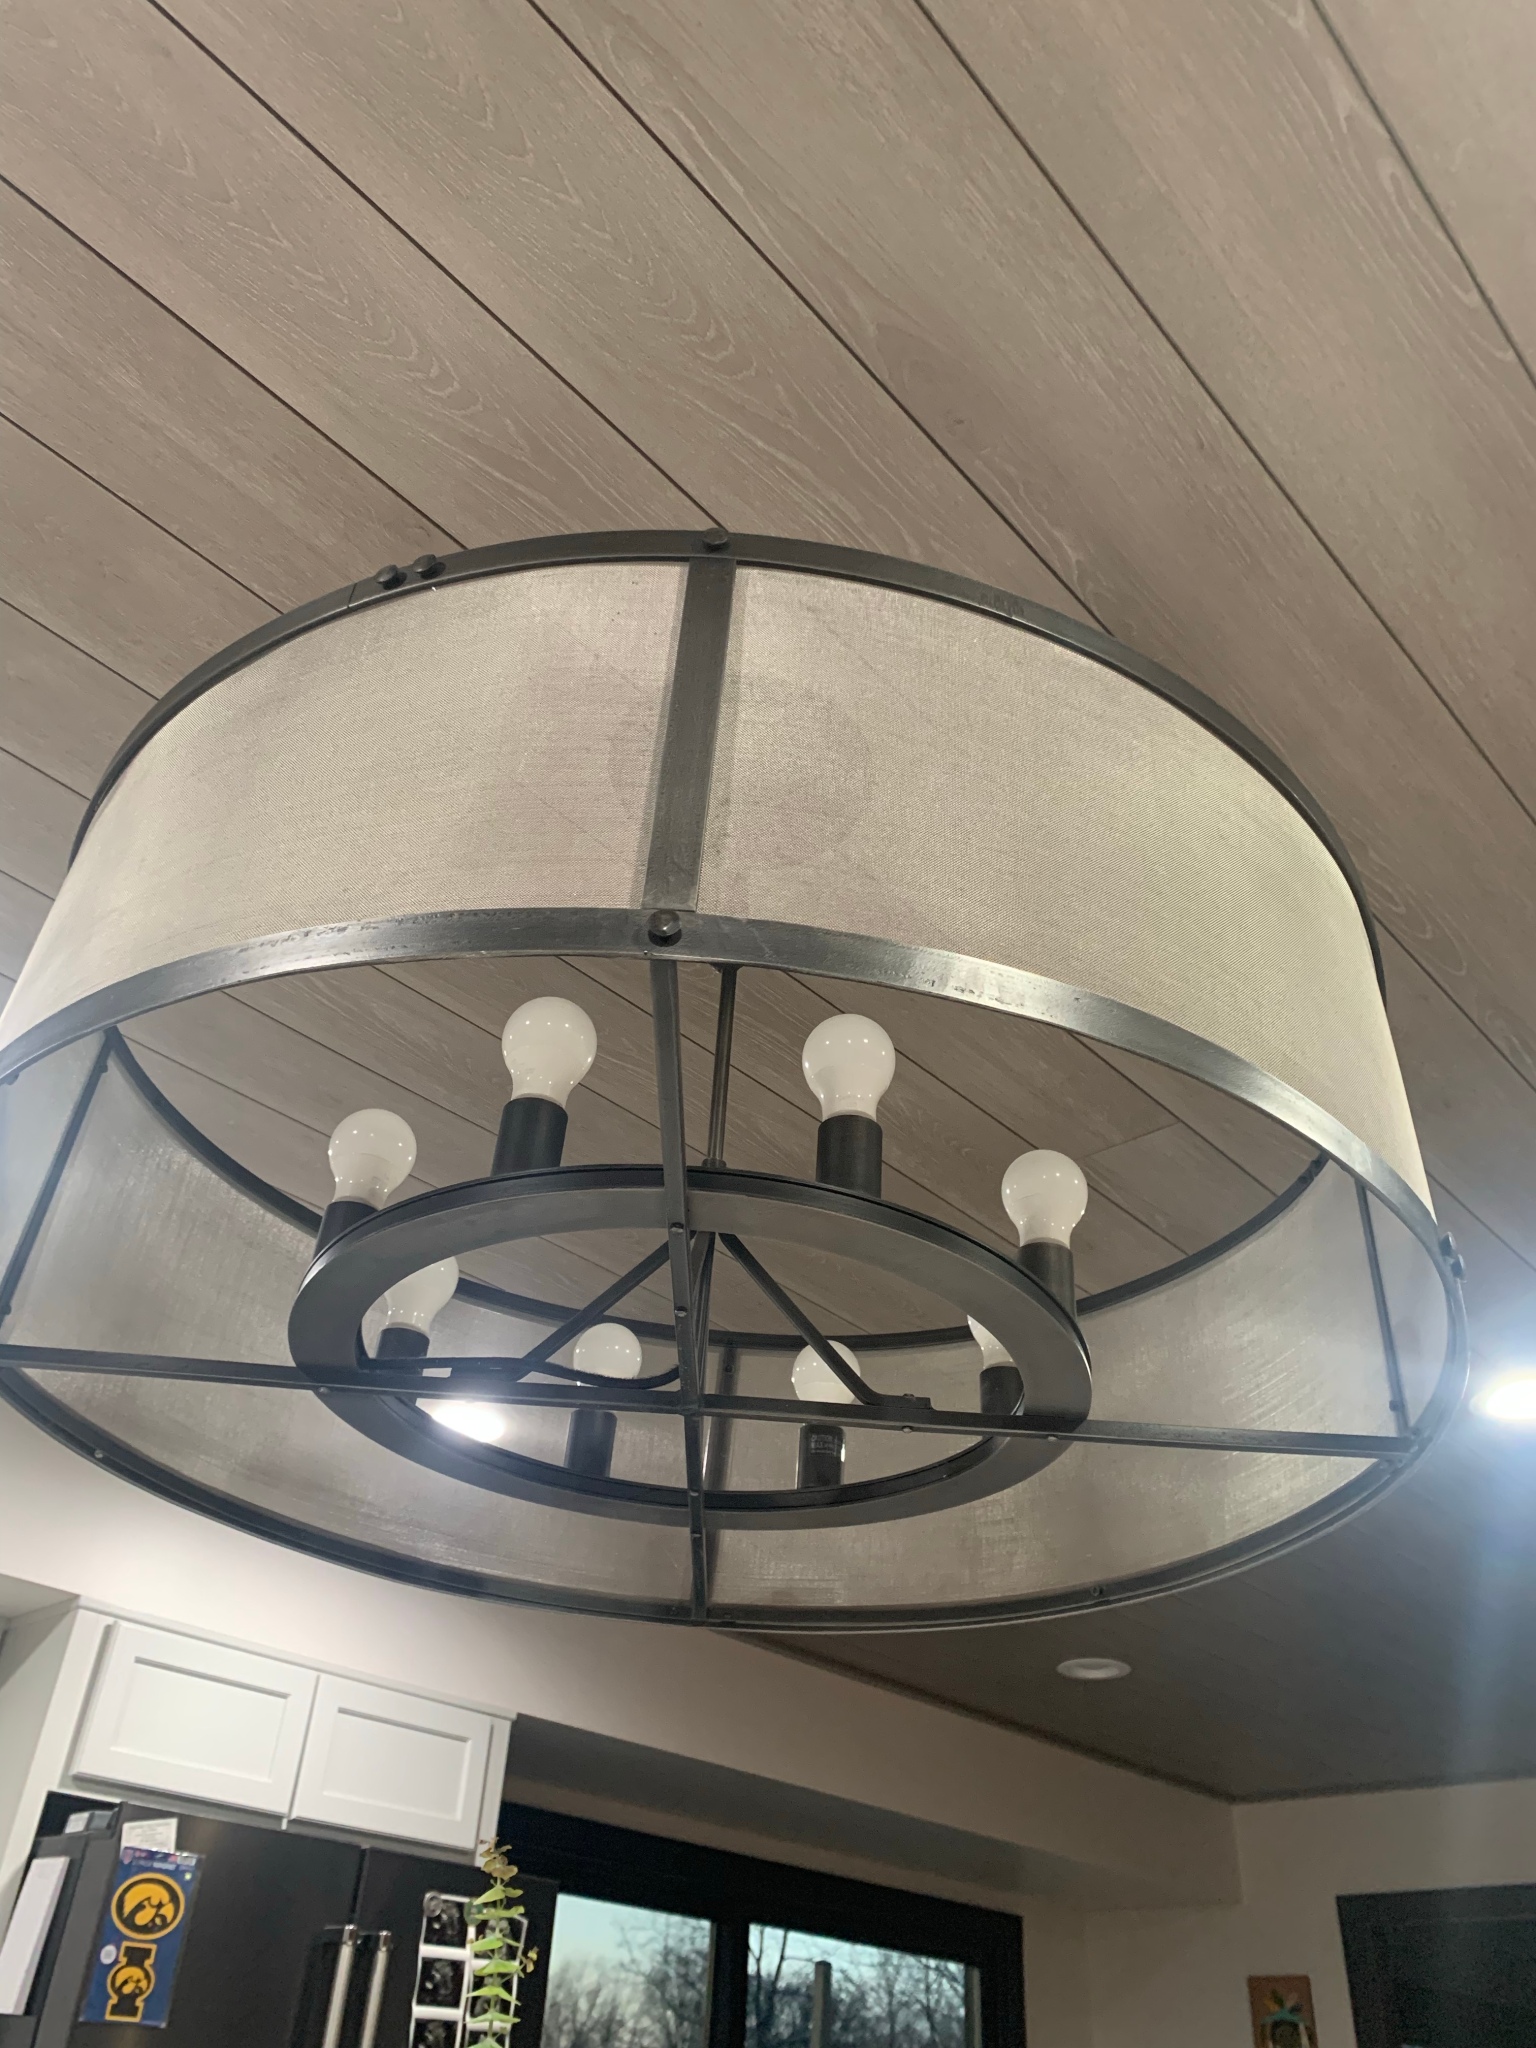
For our lighting in the kitchen, I went with recessed lighting. It’s bright and we did a lot of them because you can never have too much light. I also found an amazing chandelier at a resale shop. It used to be in a grain mill and it’s big and weighs 70 lbs. I love it and paid $500 for it. It’s so unique. I have a small light over my sink. Then we have under cabinet lighting as well. Our ceiling is a bit different, we used a shiplap paneling from Menards. This is because all of the plumbing for our house runs through the kitchen. Because we have not started our master bath yet we wanted to keep access to the plumbing, so we used this. It has tongue and grooves and just locks together. So it will be easy to access the plumbing when we work on the master!
I really love my kitchen and I think it turned out great. Actually it’s better than I expected. I can’t wait to cook Thanksgiving dinner in it or teach our child how to bake biscuits. Hopefully soon we will be able to have a big party and can have all our family and friends who have helped out with Lakelife Renovation over for a big party.
]]>To organize your garden tools, use hangers. They keep your tools off the ground and well-aired while making them easily accessible. You can hang even long-handled tools, such as shovels and forks. You can also organize your garden tools by using a hook. Moreover, a pallet rack can be used to organize your garden tools. For another garden tool organization idea, you can take a pegboard, storage container, make a shed garden, wood cart, and more. For more ideas, here are references for you.
Pegboard Garden Tools Organization from cutediyprojects
Box Storage for Garden Tools from cutediyprojects
DIY Garden Tool Rack from cutediyprojects
Garage Organization from cutediyprojects
Garden Tool Turned Into Storage from cutediyprojects
Wall Mounted Pallet Garden Tools from cutediyprojects
Repurposed Rack Organization from cutediyprojects
Recycled Coat Hangers from cutediyprojects
Hanging Wicker Basket from onecrazyhouse
Bucket Hang On the Wall from onecrazyhouse
Clay Pot Organization from onecrazyhouse
Garden Tools Wall Pegboard from onecrazyhouse
Jeans Pocket Bucket Caddy from onecrazyhouse
Mailbox Tool Storage from onecrazyhouse
Potting Bench with Sink and Hose from onecrazyhouse
Pvc Pipe and Wooden Boards from onecrazyhouse
Upcycle Old Steel Rake from onecrazyhouse
Weathered Garden Tool Rack from onecrazyhouse
DIY Storage Shed from itsoverflowing
Wooden Garden Tool Rack from itsoverflowing
Gardening Tool Holder from itsoverflowing
Pegboard Shelf for Garden Tools from itsoverflowing
Storage Wooden Cart from itsoverflowing
Vintage Bucket Garden Tools Storage from itsoverflowing
Wooden Pallet Stotage from itsoverflowing
Yard Tool Storage from itsoverflowing
DIY Vintage Pallet Organization from balconygardenweb
DIY Teak Wood Garden Tool Organization from balconygardenweb
Wall Mounted Pallet Garden Tools from balconygardenweb
Hanging Small Pallet Organization from balconygardenweb
Wall Hook Organization from thespruce
Outdoor Pegboard Garden Tool Organization from thespruce
Rustic Look Fence with Hook from thespruce
Repurpose an Old Mailbox Storage from thespruce
Scrap Wood Garden Tool Storage from thespruce
Pallet Wood Shed Organization from thespruce
Natural Wood Bench Storage from thespruce
Tool Bucket with Household Products from thespruce
Standing Wood Pallet Garden Tool Organization from thespruce
Hanging Storage on the Wall from gardeningetc
]]>
Do you think about big organizing goals and not so much about the little spaces that need organizing? Here are three small organizing spots that will make your life more organized and productive, and most importantly help your peace of mind.
What you carry with you should give you peace of mind to know you have what you need when you need it. Often your bag becomes where everything goes without order to it at all.
Once week clear out all the debris, paper and other items to keep your bag organized.
Communication with home and work is key in this new era of work from home and the uncertainty of daily life.
Spend a few minutes every day entering information as you receive it in email, in text, or from scraps of paper.
Getting ready for the day and your night time routine can be much easier when you are organized. Many times we have too many supplies in these areas to be able to get ready quickly.
Tidying your stuff daily gives you extra time to get ready and get to bed every day.
Each of these small organizing projects should take 15 minutes or less a day. Keep it simple and get it done.
The post Three Small Spots to Organize to Keep You Ahead appeared first on Ellen's Blog, Professional Organizing for Kingwood & Houston.
]]>However, not all challenges fit every money personality type. Whether you’re a self-motivated worker, an experience seeker, a challenge expert, or a flexible explorer, in this comprehensive guide, you’ll learn what budgeting challenges fit your personality the most. Let the challenges begin!
Money-saving challenges are budgeting challenges to encourage spenders to achieve a certain financial goal in a creative way. Whether that’s saving big or changing a financial habit, money challenges can help you keep track of your spending and set small achievable goals.
Saving challenges are not only fun, but they also help you start a habit of saving consistently, learn about your financial goals, track your budget, and improve your personal finances.
You can find plenty of money-saving challenges online, but it’s important to pick one that fits your budget goals and lifestyle. Choosing a challenge that fits your personality type can also make it easier to complete and achieve your money goals.
Dedicated Stewards are practical and self-motivated workers who seek security and safety. They take occasional risks and prefer to set smaller and realistic financial goals, and they also like to plan for the future and the unexpected. The Myers-Briggs types of Dedicated Stewards include:
If you want an easy challenge to start with, the 52-Week Money Challenge is a flexible challenge that doesn’t require a lot of money or effort. In this saving challenge, your goal is to deposit an increasing amount of money every week until you save $1,378 at the end of week 52. The dollar amount you save every week corresponds to the week of your challenge.
It’s always a fun surprise when you stick your hand in your pocket and find some change. But what if you could see it all stacked up in one place? Whenever you stumble upon some extra cash around the house or when you receive change from a store, keep it in a jar. Every penny counts!
Always tempted to buy things you can’t necessarily afford? Join this monthly savings challenge of carrying only cash when you go shopping, so you can only spend what you have on hand. Just don’t make this an excuse to withdraw your whole paycheck when going out.
If you get paid biweekly, this challenge can be a great way to match your paycheck with your savings plans. In this money-saving challenge, you’ll save in increments of $3, starting on the first week with $3, on the second $6, on the third $9, and so on. Every time you receive your paycheck, transfer the corresponding amount to your savings until you reach week 26, when you’ll deposit $78 to total $1,053.
You don’t have to be a penny pincher to join this challenge, but if you’re still a fan of paying with cash, this money challenge is for you. The Penny Savings Challenge is similar to the Keep All the Change Challenge, but instead you will add only the pennies to your jar. Seeing the jar fill up will show you that every penny counts and you can add it all to your savings when it’s about to overflow.
If you often find yourself going down the rabbit hole of minimalist lifestyle videos but don’t know where to start, embark on the 30-Day Minimalist Lifestyle Challenge to motivate you to change your lifestyle while de-stressing and saving money. For 30 days, follow the minimalist lifestyle tips and start practicing minimalism to help you build better money habits.
Are you a fan of the envelope budgeting system? Add another envelope to your stack and join this challenge to use it for something fun at the end of the year. This challenge is simple — every time you get a $1 bill as change, add it to your envelope for extra savings. If you prefer to save paper or spare an envelope, you can also add it to a savings jar or piggy bank.
Wealth Builders are easily inspired and value experiences over maintaining the status quo. They enjoy celebrating small victories and linking financial goals to their own financial values. They don’t spend too much time analyzing and prefer to take action to plan out their next steps. The Myers-Briggs types of Wealth Builders include:
Wouldn’t it be nice if Santa bought all the gifts on our shopping list? If you feel like you’re struggling to find funds to afford gifts for the family at the end of the year, make it a challenge to contribute a small amount to your holiday fund every week. At the beginning of the year, tally up all your holiday spending from the previous year and figure out how much you would have to save each week to reach your goal amount.
Everybody makes mistakes, but how much money would you have if you paid for every mistake you made? This money challenge is not to encourage you to make mistakes, but you can join it by adding funds to your savings every time you make a financial mistake, such as impulse purchases or paying a bill late. At the end of the day, this challenge can be a win-win — you either make fewer mistakes or save more money.
If adding funds to your savings for a money challenge every day or every week sounds like a lot of work, doing it biweekly might work better for you. In the 26-Week Biweekly Money-Saving Challenge, you can save $1,404 in a year by depositing an increasing amount every other week. Start with $4 on the first week and $8 dollars on the second. Add $4 extra to the amount every two weeks until you deposit $106 on week 26.
Friendly competitions can be fun and motivating. If you need a partner to keep you on track, challenge a friend or family member to the Money Throwdown Challenge. The rules for the challenge are up to you to decide, such as seeing who can save $1,000 the fastest or who can save the most for six months. Celebrate your earnings by going out to eat with your challenge partner and plan what you’ll do with the savings.
Are you a fan of DIYs? In this money-saving challenge, you can summon your creative skills and create a savings thermometer. Use a piece of paper or cardboard to draw a thermometer and write down your savings goal at the very top. For each temperature, list a smaller saving goal and color it in as you reach each target. Although no one wants to have a 3,000-degree fever, this is a flexible and fun challenge for every budget.
Budgeting for the holidays can be tough amidst all of the party planning, but saving small increments throughout the year can help you get a budget in place by the time December rolls around. Make it a challenge to add $20 to your holiday budget fund every week or every other week to have enough for gifts or an end-of-year vacation with the family.
If you’re looking for a money challenge that doesn’t last all year, the 3-Month Savings Challenge can help you save $1,008 in just 90 days. To join this challenge, set a reminder to deposit $84 every week for 12 weeks. You can make things easier and your savings bigger by setting automatic transfers to a high-yield savings account.
Wise Analysts are driven by thinking and lead with intellect while seeking to improve their situation. They enjoy setting clear financial goals and stay on track with automatic payments, remaining patient when it comes to results. In other words, they’re built for challenges, especially money-saving challenges. The Myers-Briggs types of Wise Analysts include:
We’re all guilty of filling our carts with things that will probably collect dust. If you feel like you’re spending a lot on nonessentials, make it fun by trying the No Spend Challenge. In this money-saving challenge, you’ll eliminate discretionary spending altogether. You can also decide on certain categories to avoid buying, such as clothes or takeout.
Get your big jars ready. In this fun money-saving challenge, your goal is to save money in increments of five. Start on day one with a nickel, adding two nickels to your jar the next day, then adding 15 cents on day three, and so on. Keep this going until day 365, when you’ll deposit $18.40 in your jar. If a nickel doesn’t sound like much, wait until you see that your big jar will have saved you $3,339.75 at the end of the year.
Instead of wearing pink on Wednesdays, why not save money? In this savings challenge, every Wednesday you’ll add money to your savings account — but there’s a twist. Before adding money, check the weather channel for the highest local temperature and match that amount to add to your savings. Now wearing your pink outfit when it’s 83 degrees outside is even better when you’re saving $83.
As scary as it sounds, trimming 1 percent of your salary doesn’t mean you’re working for less. This budgeting challenge works for every budget and can be a good way to build savings. Calculate 1 percent of your yearly salary and find ways to cut your spending by that amount. You can look at your subscription services or grocery bills, for example, and see how you can bring your budget down to end up with 1 percent of your salary as a bonus.
Ever wonder why prices usually end with .99, .79, or .88? It’s a psychological strategy to make it seem like the price is lower. If you like to save, take advantage of this strategy and join the Round Up Money Challenge by rounding up to the nearest dollar and adding those cents to your savings. For example, if you make a purchase of $2.79, round it up to $3 and add $0.21 to your savings. Some banks will allow you to do that, but there are also apps that make it easy for you to do it.
Starting with small steps can make it easier to start building positive habits. If you want to reduce your grocery bills and the number of times you eat out, plan your meals for 30 days and have your meals packed for each day of the week as part of this challenge. At the end of this budgeting challenge, compare your savings to a previous month where you ate out more often, and use it as motivation to keep the challenge going for the following months.
If you are struggling to keep up with your expenses, this challenge will help you build a habit of tracking your expenses so you can become more financially savvy. Use this budgeting challenge as an opportunity to start tracking your expenses by writing down and categorizing your expenses for at least a month. If you can keep the challenge going for over a month, you will be able to see where you can trim back your expenses and save more money. For a foolproof way of tracking your expenses, the Mint app makes it easy to reach your goals with personalized insights.
Got a stack of envelopes but don’t know who to write to? This money challenge will take care of that. Grab 100 envelopes and number them from 1 to 100. Every day or week, grab a random envelope and insert the amount of cash according to the number on the envelope, and set it aside. So if you grab envelope 38, you have to add $38 to the envelope, helping you save $5,050 at the end of the challenge. If you still have some envelopes left after you finish the challenge, you can write to a friend and let them know how much you saved.
Bold Explorers are quick and flexible thinkers who enjoy experimenting with their many passions. They avoid impulse purchases and set strict saving guidelines in order to commit to long-term plans, and they take time to analyze big decisions and avoid indulgent purchases. The Myers-Briggs types of Bold Explorers include:
Tired of spending money eating out or seeing your grocery bills stacking up? Challenge your creativity in a quest to eat as much of the food that you already have in your house as you can before you buy more groceries. By doing little to no shopping for extra ingredients, this is your chance to start meal planning and reduce waste. You might have to come up with some crazy — but still delicious! — recipes for this saving challenge.
Struggling with a bad habit and saving money? This challenge takes care of both. No matter what bad habit you have — smoking, drinking a lot of soda, or spending too much time on TikTok — it could be keeping you away from your financial goals. Kick your bad habits and reward yourself with the money you would be spending by adding it to your savings instead. Just don’t spend your reward on new bad habits.
Similar to the $1 bill challenge, this budgeting challenge will still help you save money without much effort. Any time you receive a $5 bill as change or when withdrawing money at the bank, save the $5 bills in a safe spot. Check how much you saved after a couple of months or challenge yourself to do it for a whole year.
If you think you never have extra money after paying your monthly bills, you might not be looking in the right place. Get creative with the Find Extra Money Challenge and do a sweep around your house for any spare change you might have forgotten. Look in every pant and jacket pocket, between couch cushions, and your junk drawer. Is your home spick-and-span? You can create extra money for yourself by making it a goal to spend less than your budget and adding the extra money to your savings, or decluttering your home and selling items you don’t use anymore.
Want to cut back on your expenses but can’t seem to stop your coffee runs? This savings challenge will get you motivated to make your own coffee at home while building your savings. Each time you make coffee at home instead of going to a coffee shop, deposit $2.75, or the amount you would have spent on your coffee, into a jar or straight to your savings account. Whether you have great barista skills or like it simple, coffee tastes better when you’re saving.
Free trials are great when we want to watch a movie but aren’t ready to commit to a subscription. But what happens when you forget to cancel the trial before it ends? With subscription services becoming more popular, it can be easy to lose track of your spending. Join the Cancellation Challenge by taking some time to evaluate all your subscription services, cancel any that you haven’t been using, and transfer the money you would have spent on them to your savings.
If you need money to buy a gift for a family member or save money for a dream trip, but you don’t have much time, the 12-Week Money Challenge can be a good starting point. In this challenge, you will start with $10, and each week the deposit increases by $10. When you get to the 12th week, you will deposit $120 to finish your challenge with $780 saved up.
Eating out can be tasty, fun, and doesn’t leave dirty dishes in your sink — but it does dirty up your credit card statement. If you love to dine out but want to save money for something else, attempting this money-saving challenge can be a good way to save money and brush up on your cooking skills. Since preparing your own food can be cheaper, try to see how long you can go without eating out or ordering takeout and enjoy the taste of your own cooking — and savings.
Most money-saving challenges don’t have a set starting point. Whether you decide to start on the first day of the year or on your birthday, adjust the challenge according to your savings goals and timeline. Take into consideration your schedule and current savings when deciding on the best time to start.
Budgeting can be easier when you’re having fun. Attempting a money-saving challenge can help you get one step closer to your financial goals and help you build better saving habits. Whether you finish a challenge or decide to try a different one, you will be able to learn more about your money personality and spending habits.
Sources: Myers-Briggs
The post Money-Saving Challenge: 30 Types For Every Personality in 2022 appeared first on MintLife Blog.
]]>If you have ever hired a professional organizer, have you noticed they ask you lots of questions? And they ask you to see your space? There is a lot of discussion around your purpose for the space. All of these things are important pieces that professional organizers use to help you truly get organized.
These “tricks of the trade” are things that professional organizers use to create a plan and set goals. These goals are what they use to make sure an organizing project actually meets your needs and can be maintained by you. From these goals, professional organizers can make a plan. That plan is how you are going to truly get your home organized.
So where do you even start if you don’t want to hire a professional organizer?
I am breaking down how to set goals and make a plan so you can organize your home like a professional.
Goal-setting is probably the most important piece of organizing…or any project really. Because when you set goals for specific projects, you have a clear idea of what you want to accomplish.
When I am working in virtual clients, I always ask what they want to accomplish when organizing their space.
Some people just want to have less stuff. Others want to give a room a purpose. While others hope to make finding things easier for themselves.
So it doesn’t matter what your end goal is. Just the fact that you have to have one so you know what you are aiming for while organizing.
Setting goals can be really easy or really challenging, depending on how you look at things. Sometimes you may not know why you want a space organized, so you aren’t sure what the end goal should be.
I have found doing a brain dump can help get clear on what your goal should be.
To do a brain dump, get a piece of paper and a pen. Set your timer for 15 minutes. Then write, doodle, and just keep moving that pen. I have some prompts I use to help keep me focused if I get stuck.
I usually start with making my “to do list”. Then I will write down all the steps that I need to take with each item on the list. This helps keep the pen moving.
I will also ask myself to write down my dream life. That gets the pen moving too!
You can write about the project you want to organize and how you want that to look when it is all done. As you write, ask yourself why you want the space organized. You will be surprised by what may come up.
Once the 15 minutes are up, look at your brain dump. See what things stand out. Most of the time, I find answers to questions I have been struggling with in the brain dump.
This is going to help you create your goals for your project.
I do want to add that sometimes we can get stuck on creating goals because we have some mental clutter that needs to be dealt with.
Mental clutter is just like physical clutter, but it is taking up space in our minds. It is stopping use from thinking as clearly as we possibly can.
When you clear mental clutter, you are removing things from your head space onto paper. Which is why using paper and pencil is so important. It helps our brains process better when we use paper and pencil instead of typing.
You can read my 5 Tips For Clearing Mental Clutter, which includes brain dumps and planning tips!
Once you have cleared the mental clutter and set goals, you can focus on creating a plan. That plan should include all the steps you need to take to truly organize your space.
As professional organizer do, they create an in-depth plan to keep you focused while organizing. So if you know you aren’t the best at staying on task, I recommend making a plan you can stick to.
My free plan guide below has space to clear mental clutter, plans, and more.
To create your plan, write down the area you want to organize. Then write down your goal. What do you want the space to be like once you are done?
Under the goal, write down steps you need to take to get to that end goal.
Some obvious steps include removing everything from shelves. Cleaning shelves. Removing items I don’t use. Grouping items together based on how I use them. Put items back on shelves. Go to store to get bins if needed.
In my Declutter + Organize Guide, I have space for you to plan out your organizing project along with checklists. Make sure to download that now.
You have your plan, so now it is time to take action. That means actually start the work.
I always recommend having a declutter caddy on hand for every project. It will keep you focused so you aren’t running all over the house looking for things. And it saves time! Since everything is on-hand, you can remove and clean without having to get up and down for items.
Now I have some tips for you for specific rooms to organize. Below you will find some of my favorite tips and tutorials for different rooms of your home. After you have decided on what area you are going to organize, you can read more specific tips below to help keep you focused!
Keeping bedrooms organized is the first place I recommend starting. When your bedroom space is tidy, research shows you get a better nights’ sleep because you can fall into REM sleep faster and for longer periods of time.
Effective Ways For Minimalist Living In A Master Bedroom
How To Organize A Primary Bedroom Like A Pro
In addition to keeping bedrooms organized, clothing should be organized as well. This helps eliminate indecision in the mornings when getting dressed. Because everything in your closet are things you love, wear, and fit you!
20 Ways Of Organizing Clothing In Closets
A Step-By-Step Guide To Creating A Minimalist Closet
The Hanger Trick For Your Closet
10 Tips To Organizing A Closet
Can You Really Organize A Closet Without Buying Anything?
Bathroom organization looks different for every bathroom I have ever organized. There is no one-size-fits-all when it comes to organizing bathrooms. So these tricks and tips can help no matter the space and size of your bathroom.
Best Trick For Always Having Bathroom Products On Hand
10 Insanely Easy Bathroom Storage Ideas
5 Secrets To Bathroom Under Sink Storage
How To Organize A Bathroom With Little To No Drawers
How To Organize Beauty Products In Bathroom
15 Bathroom Organization Hacks
Linen closets are my favorite places to store towels, extra toiletries, and medicines. And while not everyone has ample space for all these things, I have some tutorials for creating order in any space.
How to Organize Your Linen Closet Like a Pro
7 Effective Tricks The Pros Use When Organizing Linen Closets
10 Ways To Store All Those Extra Items
When it comes to kitchens, I always suggest doing it in one day. And use Post-It notes. Lots of Post-It notes. Most of the time, you just need to reorganize your things. Follow the guide to help if you just need to reorganize certain parts of the kitchen. These tutorials can help you organize cabinets, drawers, and everything in between!
How To Organize Your Kitchen Without Spending Anything
Best Ways To Line Kitchen Drawers
My Top 12 Favorite Kitchen Drawer Organizers
How to Organize Your Kitchen Like a Pro
4 Bite-Size Tips To Organize Kitchen Utensils In Under 10 Minutes
Tidying Up Under The Kitchen Sink
How To Organize Kitchen Drawers
Pantry organizing doesn’t need to look like Pinterest to be truly organized. Follow these pantry tips to help you organize your items in practical ways.
10 Step Process For Creating Pantry Organization That Will Last
Better Homes And Gardens Pantry
How To Organize Small Pantry Cabinets
Make Your Own Pantry Labels Tutorial
You may have toys in your living room. Maybe you keep storage items in your family room. Whatever it is you use your living room or family room for, make sure it stays organized with these tips.
6 Creative Ways To Organize Toys In The Living Room
Living Room Organizing and Design Ideas
How To Quickly Declutter Your Living Room
I call play spaces any space that has toys. That may be a living room, designated play room, or basement. Whatever it is, these tricks will help keep the space organized, even if the kids play there.
Playroom Organization The Pros Don’t Want You To Know
5 Transformation Tips For Playroom Ideas On A Budget
The One Secret Everyone Should Steal From These Playroom Ideas
8 Rookie Mistakes You Make When Setting Up A Playroom
10 Tips For Organizing Art Supplies
Too Many Toys? How You Can Declutter Easily
How Much Is Too Much When It Comes To Toys?
The Best Way To Organize Toys In Small Spaces
Office spaces have transformed over the last few years. These tutorials will help you create order in your office area.
How To Create An Office In Small Space
Organizing Office Desks Like A Professional
How To Create Desk Office Organization Like A Professional
Creative Office Supply Organization Ideas For Cabinets Or Walls
14 Easy Ways To Instantly Organize Paper Clutter
7 Ways To Reduce Paper Clutter
10 Paper Organizing Hacks You Need To Know
Organizing Paper Like a Professional
Whether you have a designated mudroom or a giant closet, these tricks will help everyone keep their jackets, shoes, and backpacks organized.
Messy Mudroom? Here’s How To Fix It
How to Organize Your Mudroom Like a Pro
Creating Mudroom Storage Like A Pro
How To Organize Your Family’s Jackets
Simple Habits For Organizing Face Masks
If you really think about it, the garage is just an extension of our home. So it should be organized too. These tips and tricks can help with creating order in any garage.
How To Get Rid Of Garage Clutter Forever
Garage Toy Storage Ideas Kids Can Do
10 Garage Storage Ideas That Will Make Your Garage Organized
The Best Garage Bike Storage Tips From A Professional
Practical Garage Tool Storage Ideas
Laundry is never fun. But when you have an organized laundry room or closet, it helps you get laundry done faster. These tutorials are sure to help create an organized laundry area.
How To Transform A Laundry Room By Adding Shelves
Do These Laundry Room Storage Ideas Still Hold Up?
Unconventional Laundry Room Hacks
Laundry Room Organization Ideas The Pros Don’t Want You To Know
I have seen it all when it comes to storage areas. So these tips and tutorials cover everything from holiday bins to sentimental items to craft supplies. Because whenever you aren’t sure where to store something, it usually ends in the storage area.
Sentimental Storage Box Tutorial
Best Solutions For Removing The Sentimental Value On Other People’s Items
Best Solutions For Parting With Sentimental Items
After You Declutter, What Do You Do With The Leftover Stuff?
The Ultimate Guide To Organizing A Craft Closet
How To Keep An Organized Craft Room
When it comes to organizing, sometimes the pros do know a thing or two about the best ways to achieve your end goal.
Start by setting that goal. Clear mental clutter so you are able to create space in your mind to make quality decisions.
Set a plan for yourself. That plan should go into details of what you plan to do.
Then take action on that plan. Make sure you stick to what you want your goal to be. And you will find yourself with an organized home!
The post How To Organize Your Home Like A Professional appeared first on The Organized Mama.
]]>It doesn’t have to be that way.
You can have an organized home. But you have to start thinking like an organizer.
Ever notice that when you go workout with a trainer, they have a plan of action for your workout routines? Well, organizers have that same plan of action. But for tackling projects. Not working out. I mean, we could have a workout plan since organizing is basically cardio. But I digress.
Organizers start with a plan. They know that organizing involves small and systematic progress to get to the end goal.
We don’t dive in and throw away all the items. Instead, we get in the right head space to support our clients.
In order to start thinking like an organizer, we have to get in the right head space and decide what the actual organizing project is going to look like. Then, and only then can we create a plan to get us there.
First thing you can do is to get in the right head space. And that means understanding that organizing is not a sprint, but a marathon. Slow and steady will get you to where you want to go.
But to figure out where you want to go, you have to start with the end in mind.
So start by defining what “done” looks like to you. When you say you are “done organizing”, what does that even mean?
Because if you don’t know what “done” looks like, you will never be done.
Get really clear on what “done” looks like.
When I am working with clients, I have them create a board on Pinterest with 5-10 images of their desired organized space. You can do the same. But stick to 5-10 pictures. Otherwise you will spend more time searching than actually organizing.
After you have 5-10 pictures of what you want the space to look like, we have to clear any current beliefs you have regarding organizing and you home.
Now what do I mean by beliefs about your home?
You have some ideas about your home and how you feel about certain areas. Everyone does. It is totally normal. But we have to address those beliefs in order to move past them and get your home organized.
Here’s an example. In our primary bathroom, we have very little storage. This is a belief I tell myself about our bathroom. We do have ample storage spaces because we have drawers on the wall, under-sink storage, and a medicine cabinet. But this belief I tell myself about our bathroom has kept the space messy and disorganized.
Why?
Because I am focusing on what we lack instead of what we have.
So changing my belief about an area helps create order because I am able to change how I view that space.
Instead of saying “my primary bathroom has little storage”. I can say “my primary bathroom has unique storage options”.
Our brains respond to how we view things. So if you view a space in a negative way, that is all you will see. But if you view a space in a positive way, that is what you focus on. So change your beliefs about your home before you even start organizing.
This is something I do with any consultation I have with an in-home or virtual client. They show me their space and tell me they have no room for this or no storage for that. And I always say, you have plenty of storage. We just need to use the space in a different way.
After you decide what “done” looks like and clear limiting beliefs on your spaces, you can create an action plan for tackling your organizing projects. But only after you complete the two tasks we previously discussed.
You need to know what “done” means so you can stop and be satisfied with your work. And you have to believe that an area can be organized because you thought about that space differently. Then, and only then, can you create a plan of action to get that space organized.
And when I say plan, I am talking about how you are going to organize one specific spot in your house. You need to break down each task so it is tangible for you.
When I work with virtual clients, the plan we create starts with what “done” looks like. Then we break up the tasks to get the space to be considered “done”. Each task helps the client to get to their idea of organized for that space. But the tasks are small so they can truly do each step. No matter how difficult it may be.
So break down your organizing projects into small tasks. Write them down. And then take action.
More Posts You May Enjoy:
How To Change Your Mindset About Organizing Your Home
The Ultimate Guide To Organizing Your Home
What Does Organized Mean To You
It can be tricky to start a big organizing project, but I can tell you that if you change how you think about the project, you are sure to keep things organized. Because you have an idea of what “done” looks like for your organizing project. And you have changed your outlook on what your space can do for you. Then you can create a plan of action to get the projects completed.
The post How To Think Like An Organizer appeared first on The Organized Mama.
]]>Before you begin any bathroom organizing project, you have to declutter! In the video above, I walk you through how to declutter a bathroom so you can have ample storage space!
When it comes to bathroom storage ideas, you are going to need under sink storage. But how can you get that space tidy? By using expandable shelf organizers!
I have more tips for how you can do that in this post.
It is no secret that I love using drawer liners to keep things in place my cabinets and drawers. And it is no secret that I find ways to decorate with shelf liners as well. But did you know that shelf liners can actually protect your cabinets? Seriously!! Shelf liners have many purposes, and protecting under bathroom sinks is probably the main reason I use them so much around my home and my clients’ homes. Which is why lining your shelves and drawers with shelf liner like Clorox brand Easy Liner, you are going to keep things tidy in your bathroom! You can read more tips here on how to line bathrooms.
When it comes to beauty products, there are many different ways to store them. You can use drawer organizers to keep your beauty products tidy in your drawers. Group the items together in the drawer organizers. I love using the new drawer organizers from the Onyx collection, exclusively at Ulta Beauty! These organizers come together in a pack of 3. But they are 3 different sizes so you can really get those different sized beauty items organized in your drawers.
You can also store beauty items in turntables. The turntable from Ulta Beauty is perfect for all your beauty products. There are dividers inside the turntable, making it easy to store items inside cabinets. I have more tips for how to use the turntable for bathroom storage ideas here.
The MadeSmart Turn It Organizer from The Container Store is my favorite bathroom storage for your hair dryer, brushes, and curling irons! I use it in my bathroom along with all my clients!
When you are limited on drawer space in your bathroom, you are going to need products to create storage without taking up much space! Which is why I love using products with drawers to help you keep things organized, like make-up or beauty products. You can read more tips on how to do that here.
The back of the bathroom door makes for great storage in small bathrooms! Attach hooks or bars to hold towels if you are limited on wall space. I love these basket and towel holders to help with towel storage.
I love using trays on top of the counters. It is a rather easy fix to keep your counters looking tidy, while still keeping all the necessities out!
Figure out what products you need out and which can be stored in a drawer. Then find a tray that fits both the space and size of the products you need out. This way you are only buying something that is the perfect size for your space!
Sometimes the easiest way to organize is with smaller bins. Try using stackable bins to keep your stuff organized either out on the counter or under the sink like these.
These bathroom ideas with storage are sure to help you get things organized. Pick the ideas that will work for you in your bathroom. Test out and see how it works, then tweak what you need so that you are sure to have ample organization in your bathroom!
Some links may contain affiliates.
The post 10 Insanely Easy Bathroom Storage Ideas appeared first on The Organized Mama.
]]>The first of the turntables is one with handles. I like this one for cabinets that are lower. It makes turning the tray easier with the handles and the lip keeps things from wobbling on the tray.
This Lazy Susan organizer is great for kids’ art supplies or your office desk supplies! I love keeping this on a counter to make getting your supplies easy.
The large Lazy Susan organizer is great for under sinks. Because they are divided, they work well for holding lots of different bathroom items that may need to be stored under the sink.
I use these under kitchen sinks all the time. Since they are so large, they hold a lot of cleaning supplies. Just make sure you can swivel the Lazy Susan with the pipes.
I love this decorative spin tray. Keep it on your counter to hold cooking oils!
Again great decorative spin tray. You can use this on the counter or on the table to hold items many family members may need to grab.
I love bamboo, so this turntable is amazing. It is great for being out on the counter or in a cabinet.
I use this small turntable inside our fridge for holding our condiments. Nothing gets lost in the back when you can spin to find the condiment you need.
If you have a cabinet that is L-shpaed, this turntable is perfect for giving you more space in the back without worrying things will get lost.
Another great option for a corner cabinet that is cut at a diagonal.
I love using non-skid turntables for holding cooking oils. You don’t have to worry about the glass bottles breaking when you turn.
This is a great turntable for displaying on your counter on in your cabinets.
I love this marble and wood Lazy Susan for display. You can add food to this tray or have it out on your counter to hold your everyday cooking items.
This turntable has 2 levels, making it perfect for holding spices or cooking oils in a tall cabinet.
This Lazy Susan organizer is also a great option for holding spices and cooking oils in a cabinet.
I love this tall turntable for storing hair dryers and curling irons under the bathroom sink.
Using Lazy Susans with sides helps keep the items on the turntable from sliding around. Which is why this is a great option to add to your cabinet to store things.
If you do use a turntable without sides, make sure that your items that spin are fine while spinning. I like these types of turntables for canned goods.
Another great option to use when storing canned goods or jars with these Lazy Susan organizers with low sides.
This is a great product to hold craft supplies in a cabinet.
As you can see, there are so many options for using turntables, Lazy Susans or spin trays! No matter what you call them, they are super handy to keeping your home organized! Want more tips and tricks to organize with Lazy Susan organizers? Check out the posts below:
How To Organize Your Entire House With Lazy Susan Turntables
35 Ways To Organize Your Home With Turntables
Some links may contain affiliates.
The post Top 20 Lazy Susan Organizers For Your Home appeared first on The Organized Mama.
]]>